Showing posts with label Italian. Show all posts

Tuesday, January 10, 2012

Gnocchi!

Recently, Joe and I went out in Denver and ate at Jax Fish House.  We were planning on getting an appetizer each, but then couldn't resist sharing their Potato Gnocchi instead- served with braised pork ragu, rock shrimp, squash, turnips, and arugula.  One of the best things I've eaten recently - and the best gnocchi I've ever had - light and pillowy and airy and tender.

I've made gnocchi once before, and eating this dish at Jax makes me excited about cooking them again.  Maybe with practice, I'll be able to replicate the texture of the gnocchi at Jax.


GNOCCHI with BROWN BUTTER SAGE SAUCE- serves 6-8

INGREDIENTS:

Gnocchi:
  • 3 large russet potatoes, scrubbed
  • 1 egg yolk
  • about 2 1/3 cups all-purpose flour
  • white pepper
 Sauce:
  • 1/2 stick unsalted butter
  • 1 tablespoon chopped fresh sage
  • Kosher salt and freshly ground pepper
  • About 1/4 cup freshly grated Parmigiano-Reggiano
STEPS:
  1. Preheat oven to 350 F.
  2. Prick the potatoes several times with a fork and bake them until they are soft, about 1.5 hours.
  3. While they're still hot, cut all the potatoes in half lengthwise, creating as much surface area as possible so the steam billows out. (Steam is water; the less water the potatoes contain, the less flour you will need. The less flour, the lighter the gnocchi.)
  4. Scoop the potatoes out of the skins and into a food mill or fine-holed ricer (I found an antique food mill at Goodwill!).
  5. Pass them through the food mill or ricer onto a large clean work surface - use your countertop or kitchen table.
  6. Spread the potatoes into an even rectangle about 24" x 12".
  7. Season the potatoes generously with white pepper (if available).
  8. When they are no longer hot to the touch, almost room temperature, beat the egg yolk. Drizzle the egg yolk over the potatoes.
  9. Measure 1 1/4 cups flour and sprinkle this over the potatoes.
  10. Using a pastry scraper (or the edge of a spatula), cut the flour and egg into the potatoes, chopping and then turning the mixture in on itself and folding it together, until everything is well mixed and the dough resembles coarse crumbs. Bring the mixture together into a ball.
  11. Sprinkle a scant 1/4 cup flour on the work surface. Place the dough on the flour and press down, flattening it into a disk with both hands. Dust the dough with another scant 3/4 cup flour. Using your hands, fold and press the dough until the flour is incorporated. Add two dustings of flour to the work surface and dough and repeat. If the dough still feels sticky, repeat once more, this time covering both the table and the dough with no more than 2 tablespoons flour.
  12. Roll the dough into a compact log. Dust the outside with flour, then allow the dough to rest for about 5 minutes.
  13. Dust the work surface lightly with flour.
  14. Divide the log into 8 pieces. Roll each section into a "snake" about 1/2" thick (Joe helped with this - it was fun to make them!).
  15. Using a floured knife or pastry cutter, cut the dough into gnocchi about 1" long.              
  16. Bring a pot of salted water to a boil. Working in two or three batches, drop the gnocchi into the water and cook, stirring occasionally, until they float, 2 to 3 minutes. Retrieve the gnocchi with a slotted spoon and put them on a baking sheet or plate.
  17. While the gnocchi cook, melt the butter in a large skillet over medium heat. Add the sage and season with salt and pepper. Allow the butter to brown slightly, about 4 minutes. Add the gnocchi to the browned butter and remove the pan from the heat. Mix gently and serve topped with Parmigiano.
I served this with broiled lobster tails (they were on sale for a great price!!) and creamed corn.

Sunday, January 8, 2012

Baked Manicotti (and a simple sauce recipe)

 
There are certain foods that have always intimidated me.  Manicotti is one of them.  The thought of trying to pipe cheese filling into cooked tubes of pasta sounded difficult and frustrating.  And then came a revelation.  On America's Test Kitchen one Saturday morning, the topic was manicotti.  On ATK, their goal is to take something that's difficult and make it accessible.  This episode fulfilled that promise and introduced me to a novel idea:  manicotti made with lasagna noodles.  I've made them twice so far, and the reviews have been very positive - this recipe is a keeper.  Also, the sauce is very simple and tastes good on its own if you need a quick recipe.

BAKED MANICOTTI - makes 16 manicotti - serves up to 8 people.

INGREDIENTS:

Sauce:
  • 2   28-ounce cans whole plum tomatoes (in juice)
  • 2 tablespoons extra-virgin olive oil
  • 3 medium cloves garlic , minced or pressed through garlic press (about 1 tablespoon)
  • 1/2 teaspoon hot red pepper flakes (or less, to taste)
  • 2 tablespoons chopped fresh basil
Filling:
  • about 3 cups ricotta cheese - if you're fortunate enough to get to choose between several brands, choose one without stabilizers (*note* from what I've found, the big containers have ~2.5 cups - I've used these and then filled the manicotti a little bit less)
  • 4 ounces grated Parmesan cheese (about 2 cups)
  • 8 ounces shredded mozzarella cheese (about 2 cups)
  • 2 large eggs, lightly beaten
  • ground black pepper
  • 2 tablespoons dried parsley leaves
  • 2 tablespoons chopped fresh basil
Other:
  • 16 no-boil lasagna noodles (*note* I've used Barilla and Ronzoni - Barilla has 16 noodles/box, Ronzoni only has 12 so you'll have to buy 2 boxes and have leftovers)
STEPS:

The sauce, filling, and noodle prep can be done simultaneously.

Sauce:
  • Pulse one can of tomatoes in a food processor or blender until coarsely chopped.
  • Heat the olive oil in a large pot over medium heat.  Once hot, add garlic and red pepper flakes (if using) and cook for 1-2 minutes (the garlic will be fragrant, but not brown).
  • Add first can of tomatoes to the pot.  Stir.
  • Pulse second can of tomatoes.  Add to pot.  Stir.  (You could do both cans at the beginning and reserve in a bowl, but I prefer to conserve dishes.)
  • Cook for about 15 minutes, until slightly thickened, stirring occasionally.
  • Remove from heat and add chopped basil. 
Filling:
  • In a medium bowl, combine ricotta, 1 cup Parmesan, mozzarella, eggs, pepper (to taste), and herbs in medium bowl.
  • Mix well.  Set aside.
Noodle Prep:
  • Bring about 4 cups of water to a boil. 
  • (Very carefully) pour the boiling water into a 9"x13" glass pan.  Add noodles one at a time.  Allow to soak for about 5 minutes, or until pliable and similar to the texture of fresh pasta.  While soaking, move the noodles around with the tip of a sharp knife to avoid sticking.
  • Remove the noodles and lay them out in a single layer on clean kitchen towels.  Dump out water and dry dish.
Assembly:
  • Preheat the oven to 375 F.
  • Scoop a scant quarter cup of filling onto each noodle.
  • Spread the filling over 3/4 of the noodle, leaving 1/4 on an end exposed.

  • Evenly cover the bottom of the 9"x13" glass baking dish with 1.5 cups of sauce.
  • Starting at the end with filling, roll each noodle into a tube shape.  (The non-filled portion of noodle should help the end of the tube stick).
  • Place seam-side down in the baking dish.  (In the occasion in this picture, I used 2 8"x8" baking dishes because my 9"x13" was in use.)

  •  Roll up the remaining manicotti and add to the dish.  I slide them into place so that there is sauce between each tube - otherwise the noodles may stick together.
  • Top with the remaining sauce, making sure to cover all of the manicotti.  (If there's enough, keep about a cup to the side to serve with them at the end.)
  • Cover the pan with foil.  Bake for 40 minutes.
  • Remove the foil.  Top with remaining cup of Parmesan.  Bake for an additional 4-6 minutes, until the cheese starts to get brown spots.
  
  • Allow to cool for 10-15 minutes.
  • Serve with a green salad and Italian bread.  Enjoy!


Thursday, November 18, 2010

Learning to Love Leftovers

I have never been a huge fan of leftovers, but with cooking for 2, we ALWAYS have something to put back in the fridge.  By "tweaking" the original meal, even by just a little, I can get excited about eating it again.


Original meal:  pasta with homemade tomato/bell pepper sauce.

Leftover 1:  I threw together some quick meatballs and simmered them in the sauce (not a huge change, but different enough that I didn't find it boring) = spaghetti and meatballs (Joe's favorite food).


Leftover 2:  Meatball subs (which also used up the deli rolls that we had left from a cookout).

Other recent leftover transformations:
roasted chicken --> chicken salad and chicken pot pies
gravy --> chicken pot pies
chili --> frozen in a muffin pan (then I removed the lumps and threw them in a ziplock in the freezer) so that we can heat up individual servings when we want them!
chopped up kale and leftover leek greens --> kale, chorizo, potato soup

Some leftovers DO get better after sitting in the fridge.  The chicken cacciatore with olive rice that I made recently was one of those, as is my chicken marsala, and most soups.  Thanksgiving leftovers are still pretty awesome the next day too, I'm excited for next week!

Now if only I could find something good to do with leftover mashed potatoes...

Wednesday, November 17, 2010

Boulder Farmer's Market, Take 2

After eating our fresh radishes last week, we HAD to go back to the Farmer's Market on Saturday.  This time we remembered our camera!  The weather wasn't as nice (it was low-mid 40s) but the market was still incredible.  We loved seeing the piles of beautiful local produce and were treated to some samples (radishes, carrots, apples, cider, cheese, salmon, brownies, nuts...) along the way.

Winter radishes come in black, green, and "watermelon."


Garden fresh greens, turnips and sunchokes.


This weekend, we decided to enjoy lunch while at the market.  I got half a margarita pizza cooked in a mobile brick oven.  This was the BEST pizza I've had since Italy!!!


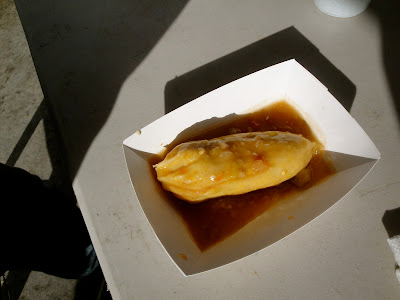
 Joe had a homemade chicken tamale with green chile.  Removed from the husks while he waited.

Our treasures from this week's market.  We wanted to buy a bunch more but restrained ourselves because there's nothing more sad then seeing produce spoil.  The pictures of the radishes cut up are much cooler, but its neat to see what they looked like whole.
Green radish, watermelon radishes, 1 lb beet, carrots
Radishes!!  YUM!!!


The weather has been so moderate that they're acutally extending the market one more week!  Perhaps we will have to go again to get more radishes (we're fairly obsessed right now, if you couldn't tell!).

Sunday, October 24, 2010

Perhaps My Favorite Meal in Italy

Amid exploration of the hill towns of Umbria (2007), we happened upon a very small town called Orvieto.  We got there in the evening, and there wasn't much open, but we certainly had to pay respects to their INCREDIBLE Duomo, which is covered in mosaic tile on one side.


Next to the Duomo, there was a small restaurant that happened to be open.  We sat on their patio, in a corner of the Duomo's piazza.  None of the wineries in the town were open, so we asked the waiter to pick out a local wine for us to try.  He suggested that instead of a full bottle, he could create a tasting of his own.  Along with our wine tasting, we asked if he could also put together some kind of sampling of the local foods.  These are what he came up with:

Half of the meats on this platter, he called "particulare," because they were local specialties that don't have English names.  It was an assortment of local salamis, and other cured meats.  I'm not sure what they all were, but I would love to duplicate that platter again!

He also made a platter of local cheeses.  Two sheep's milk, one goat milk, and one cow milk.  Surrounding some luscious local pears.  Perfecto!

Of course, there was also freshly baked bread and local olive oil on the side.  While this was by no means our biggest meal of the trip, it was incredibly local, personalized, and fit the atmosphere.  Our waiter was also so proud to show off the local specialties!

Friday, October 22, 2010

Food and Travel

Over the past few years, I have discovered that when I travel, my favorite pictures are usually the ones I took of food.  Yes, I am that strange person that takes out a camera, even in the middle of a fancy restaurant...  In 2007, my family and I went on a trip to Milan, Florence, and the hill towns of Tuscany and Umbria.  Here are a few of my food photos from that trip:

Bruschetta with (clockwise from top left) pate, roasted garlic, tomatoes, arugula and parmesan reggiano
Fresh pasta with rabbit sauce

Possibly octopus?

Prosciutto and pineapple

Ravioli

Port with cantucci


If you haven't travelled to Italy yet, you need to!  The food there is incredibly fresh and cannot be replicated outside of the country.  And the wine, wow....!